This article is the 6th day of the Nature Remo Advent Calendar 2022, an event where during the first 25th days of December we will write articles related to Nature. Please have a look to read some awesome stories.
Introduction
Hi, I'm Arnaud (@ArnaudDerosin). I am working as a Mobile Engineer at Nature. If you wonder what do you need to know before starting to support widget for your application you're on at the right place!
In this article, I will detail my recent experience developing Nature Remo widgets and compare both platform widget specifications (iOS / Android), the goal is to share in a condensed way the knowledge I acquired developing widgets, explaining you the edge cases and issues I encountered that I hope should optimize your development time!


Table of contents
- Introduction
- Table of contents
- How to create widget with React Native?
- History of widgets
- Refresh logic differences (Timeline vs Broadcasts)
- Dimensions differences
- Make the widget configurable
- Some limitations and edge cases to consider
- Conclusion
How to create widget with React Native?
Simple, it’s not supported yet. 😁
After investigating about actual support for developing widgets with React Native, we realized that there was no official support in the React Native community for developing widgets. For Android, RemoteViews are the only way to create widgets and the specific development we wanted to make related to iOS widget was what confirmed us to go for Native development.
Learn more: https://reactnative.dev/docs/app-extensions#today-widget
History of widgets
Android 🤖
Android widgets are part of Android since 2008!! Let’s have a look at the history of changes and improvements since then:
2009 - Android Cupcake (2): AppWidgets are introduced and API is available.
2011 - Android Honeycomb (3): Home screen widget resizable.
2012 - Android Jellybean (4.2): Widget categories.
2018 - Android Pie (9): Reconfigurability, hideability.
2021 - Android 12 (MAJOR IMPROVEMENTS): Rounded corners, device theming (dynamic colors to be consistent with system device), sizing, improve widget picker experience (add description of widget and preview layout, and more...
Please refer to the official documentation below if you would like to have a look at all changes that Android 12 brings to AppWidgets.
Source: https://developer.android.com/about/versions/12/features/widgets#improve-widget-picker-experience
iOS 🍎
Compared to the Android platform, iOS widgets did their apparition from iOS 8 released in 2014 but their usage was first restricted to the notification center.
From 2020 and the release of iOS 14, widgets have been able to be placed on the Home screen in 4 different sizes. Also related to widgets, the Smart Stacks have been implemented at the same time.
In 2022 with iOS16, LockScreen widgets are introduced and allows you to show widgets directly on your lock screen but we will not cover them in this article. Please refer to my article related to Lock Screen widgets or the official documentation if you want to learn more about.
Refresh logic differences (Timeline vs Broadcasts)
iOS 🍎
Widget provides information though a Timeline, the timeline manage the way how to update your widget with a reload policy. Because reloading widgets consumes system resources and causes battery drain due to additional networking and processing. It’s important to request what’s necessary at the right time.
There is 3 types of reload policy:
- atEnd: Specifies that WidgetKit requests a new timeline after the last date in a timeline passes.
- after: Specifies a future date for WidgetKit to request a new timeline.
- never: Specifies that the app prompts WidgetKit when a new timeline is available.
For example, with the iOS Nature Remo Widget we refresh the widget every hour and request a new timeline when the day change.
Android 🤖
The AppWidgetProvider class handles widget broadcasts and updates the widget in response to widget lifecycle events. You can add your own logic and handle broadcast to refresh the widget when needed but when your update frequency is not less than 30 minutes and doesn't require to be updated on a specific time, you can simply rely on the attribute android:updatePeriodMillis in your .xml configuration file.
<appwidget-provider xmlns:android="http://schemas.android.com/apk/res/android"
        android:updatePeriodMillis="1800000"
</appwidget-provider>
If you need manual update, an easy solution is to periodically launch the same Intent the Android system does: ACTION_APPWIDGET_UPDATE
The example bellow is showing you how to send a broadcast that will trigger the update of the widget:
// Send a broadcast so that the Operating system updates the widget
val appWidgetManager = AppWidgetManager.getInstance(this)
val appWidgetIds = appWidgetManager.getAppWidgetIds(ComponentName(this, RemoWidget::class.java))
val updateIntent = Intent(ACTION_APPWIDGET_UPDATE, null, this, RemoWidget::class.java)
updateIntent.putExtra(AppWidgetManager.EXTRA_APPWIDGET_IDS, appWidgetIds)
sendBroadcast(updateIntent)
This example show you how to trigger the refresh like the system do but feel free to declare and handle different intent for specific use case! 👀
Dimensions differences
Dimensions and difference of ratio is something that you have to consider if you want to support the same widget UI on both platform. Especially if the content is not mean to be resizable (full screen graph, specific image sizes, …)
iOS 🍎
4 sizes: Small, Medium, Large, Extra Large (iPadOS only)

Source: https://developer.apple.com/design/human-interface-guidelines/components/system-experiences/widgets/
To tell your widget which size you want to support we need to use modifiers to provide the families the widget supports.
@main
struct NatureWidgets: Widget {
    let kind: String = "NatureWidgets"

    var body: some WidgetConfiguration {
        IntentConfiguration(kind: kind, intent: SelectAreaIntent.self, provider: Provider()) { entry in
            NatureWidgetsEntryView(entry: entry)
        }
        .configurationDisplayName("WIDGET_TITLE")
        .description("WIDGET_DESCRIPTION")
        .supportedFamilies([.systemMedium]) // Supported sizes can be added here (.systemSmall, .systemMedium, .systemLarge, .systemExtraLarge)
    }
}
Android 🤖
In the res/xml/ folder you need to define the AppWidgetProviderInfo object in an XML resource file using a single <appwidget-provider> element and save it in the project's. The AppWidgetProviderInfo defines the essential qualities of a widget and will be the place where you set the attributes related to the size of the widget.
Related to your needs and minimum supported version your configuration might change, for example some attributes like targetCellWidth and targetCellHeight added with Android 12 will be ignored in Android 11 and lower, and may be ignored if the home screen doesn’t support a grid-based layout. You can find all the details that will help you to set up the perfect configuration here.
Example of configuration with attributes related to sizes:
<appwidget-provider xmlns:android="http://schemas.android.com/apk/res/android"
    android:minWidth="80dp"
    android:minHeight="80dp"
    android:targetCellWidth="2"
    android:targetCellHeight="2"
    android:minResizeWidth=”40dp”
    android:minResizeHeight=”40dp”
    android:maxResizeWidth="120dp"
    android:maxResizeHeight="120dp"
    android:resizeMode="horizontal|vertical|none" />
Make the widget configurable
If your widget have to be configurable, the implementation flow is quite different between iOS and Android. I will describe the differences below:
iOS 🍎
To add configurable properties to your widget here is the main steps:
- Add a custom intent definition that defines the configurable properties to your Xcode project.
- Use an
IntentTimelineProviderin your widget to incorporate the user’s choices into your timeline entries. - If the properties rely on dynamic data, implement an Intents extension.
If you don’t have a custom intent definition file yet let’s add an .intentdefinition file to the Xcode project by selecting File > New File > SiriKit Intent Definition File.

After selecting the .intentdefinition, Xcode shows an intent definition editor where we can configure parameters that allow users to customize their widgets.
Parameters can be of two different types:
- A static list of choices (example below): In that case choose the Add Enum menu item to create a static enumeration
- Generated dynamically: Use a type with dynamic options instead.
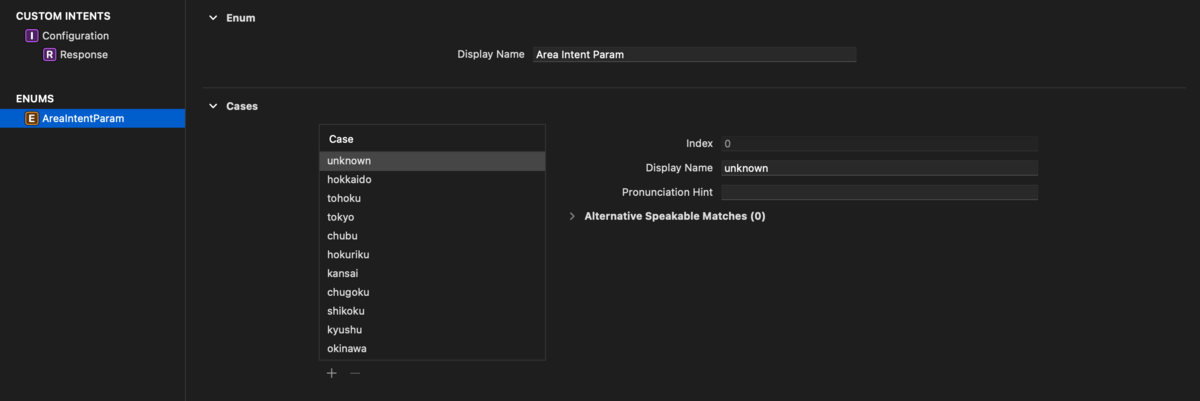
In this example, once the users edit a widget and select an area, the next step is to reflect their choice in the widget's content. ConfigurationIntent is passed in as parameter, so we can access the selected area and start to implement some logic.
func getTimeline(for configuration: ConfigurationIntent, in context: Context, completion: @escaping (Timeline<Entry>) -> ()) {
    // We can get the ConfigurationIntent passed in as parameter and provide appropriate results.
    // Like this: configuration.area

    var entries: [SimpleEntry] = []

    // Generate a timeline consisting of five entries an hour apart, starting from the current date.
    let currentDate = Date()
    for hourOffset in 0 ..< 5 {
        let entryDate = Calendar.current.date(byAdding: .hour, value: hourOffset, to: currentDate)!
        let entry = SimpleEntry(date: entryDate, configuration: configuration)
        entries.append(entry)
    }

    let timeline = Timeline(entries: entries, policy: .atEnd)
    completion(timeline)
}
Android 🤖
If you’d like users to be able to configure your widget’s settings it’s simple but compared to iOS you will be responsible to implement your own layout. It can be resumed to 3 main steps:
- Create an Activity (that will be automatically launched by the app widget host either when the widget is created or later, depending on the configuration options you specify).
- Declare the configuration activity
- Implement the configuration activity
The configuration activity will be launched by the app widget host with the ACTION_APPWIDGET_CONFIGURE action, so add this intent in your activity.
<activity android:name=".WidgetNameConfigurationActivity">
    <intent-filter>
        <action android:name="android.appwidget.action.APPWIDGET_CONFIGURE"/>
    </intent-filter>
</activity>
Then declare the configuration activity in the AppWidgetProviderInfo XML file, with the android:configure attribute
<appwidget-provider xmlns:android="http://schemas.android.com/apk/res/android"
        android:configure="com.remo.android.WidgetNameConfigurationActivity">
</appwidget-provider>
There is important point to remember during the implementation:
- The configuration activity should always return a result. (including the App Widget ID passed by the Intent that launched the activity in Intent extras)
- When a configuration activity is launched, the onUpdate() method is not called, it is the responsibility of the configuration activity to request an update when configuration is complete.
Here is sample implementation handling the case where user want to cancel the action and the widget should not be added.
class WidgetNameConfigurationActivity : Activity() {
    private var appWidgetId = AppWidgetManager.INVALID_APPWIDGET_ID

    public override fun onCreate(icicle: Bundle?) {
        super.onCreate(icicle)
        setContentView(R.layout.forecast_electricity_widget_configure)

        // Set the result to CANCELED.  This will cause the widget host to cancel the widget placement if the user presses the back button.
        setResult(RESULT_CANCELED)

        // Find the widget id from the intent.
        val intent = intent
        val extras = intent.extras
        if (extras != null) {
            appWidgetId = extras.getInt(
                AppWidgetManager.EXTRA_APPWIDGET_ID, AppWidgetManager.INVALID_APPWIDGET_ID
            )
        }

        // If this activity was started with an intent without an app widget ID, finish with an error.
        if (appWidgetId == AppWidgetManager.INVALID_APPWIDGET_ID) {
            finish()
            return
        }

        /* Here add your configuration and layouts */
    }

    // Method that will be called when confirm button is pressed to add the widget
    private fun configureConfirmButton(appWidgetId: Int) {
        val confirmButton: Button = findViewById(R.id.widget_config_confirm_button)
        confirmButton.setOnClickListener {
            // It is the responsibility of the configuration activity to update the app widget
            val appWidgetManager = AppWidgetManager.getInstance(this)

            /* Here you can add the logic to update the widget with a RemoteViews layout by calling updateAppWidget(int,RemoteViews) or if you need some fetch action before it could be called here */

            // Make sure to pass back the original appWidgetId
            val resultValueIntent = Intent()
            resultValueIntent.putExtra(AppWidgetManager.EXTRA_APPWIDGET_ID, appWidgetId)
            setResult(RESULT_OK, resultValueIntent)
            finish()
        }
    }
}
That’s it! Your widget now support configuration. 🥳
If you want your users to be able to reconfigure the widget you just need to specify the reconfigurable flag in the widgetFeatures attribute of your appwidget-provider like this example below:
<appwidget-provider
    android:configure="com.remo.WidgetNameConfigurationActivity"
    android:widgetFeatures="reconfigurable">
</appwidget-provider>
Some limitations and edge cases to consider
iOS 🍎
An iOS widget present read-only information and don’t support interactive elements such as scrolling elements or switches.
Gestures and deeplink
By default when you tap the Widget, the main application will be launched, you can update that behavior but here is some restrictions concerning the deep links.

systemSmallwidgets are only one tappable areasystemMediumandsystemLargecan use the Link API to create tappable zones within the widget with each linking to a different view in the app when tapped.
Android 🤖
Layout restrictions
Android widget layout is based on RemoteViews, which do not support every kind of layout or view widget. From Android 12, four widgets / layouts have been added but you cannot use custom views or subclasses of the views that are supported by RemoteViews.
This restrictions could be challenging if you want to make complex UI (Showing graphs, dynamic overlay, …)
Transparent graph background
Our Android widget chart is built using the MPAndroidCharts library and overwritten with some custom UI (peak marker and axis). Because of the RemoteViews usage restrictions, we couldn’t use the graph "as is" and we had to export the charts as a bitmap before setting it to an RemoteView.ImageView.
After having constructed the chart, created the bitmap from .getChartBitmap() then set it to a RemoteView.ImageView we realized that the background of graph was not transparent like we’ve set it up. The reason is that the library is using Bitmap.createBitmap(getWidth(), getHeight(), Bitmap.Config.RGB_565) with RGB_565 as parameter where only the RGB channels are encoded.
If you encounter that case the solution is to use .drawToBitmap(Bitmap.Config.ARGB_8888) with ARGB_8888 bitmap config which return a Bitmap representation of the view (LineChart graph in that case) and support transparent channel.
private fun setLineChartImageView(views: RemoteViews, lineChart: LineChart) {
    // Android ref: https://developer.android.com/reference/kotlin/androidx/core/view/package-summary#(android.view.View).drawToBitmap(android.graphics.Bitmap.Config)
    val returnedBitmap = lineChart.drawToBitmap(Bitmap.Config.ARGB_8888)
    views.setImageViewBitmap(R.id.widget_chart_image_view, returnedBitmap)
}
Supporting different minimum version between Android Application and Widget
If you need your app and widget to be supported form different versions, for example your app from Android 10 but the widget from Android 12 you might have some difficulty finding an official way to do it. Actually, the developer is responsible to implement it, here is the logic I used:
- Create a
res/values/bools.xmlandres/values-v31/bools.xmlfile defining a boolean resource with the same name:is_api_31 - Set the boolean resource to
falseandtruerespectively - In the AndroidManifest, on the receiver element for
HogeHogeWidgetadd theandroid:enabled="@bool/is_api_31parameter.
That way your widget will only appear from the version you specified.
Conclusion
Developing widgets for Android and iOS have been amazing experience and I learned a lot from. Widgets can quickly become complex related to your needs in terms of design and functionality, developing Android widget was definitely more challenging (different sizes, custom launchers, RemoteViews restrictions, device theme / language changes, ...).
There is still a lot to share that would be subject to another article and I’m already looking forward to make widgets with different functionalities with as mission to bring value and simplify the daily life of our users.
Thank you for reading, I hope you learned from this article, let’s build amazing widgets! 🥳